Showing posts with label ultimate recipe swap. Show all posts

Thursday, November 18, 2010

Three Cheese Fondue

Ah, my 2nd attempt at cheese fondue. I'm pretty much ready to bath myself in this stuff.

I found a recipe on the 'net, but decided to change things up a bit when I saw the price of Emmentaler that day at the grocery store. What fun is life if you can't make up your own fondue rules, right? Right. So instead of Emmentaler, I used Gouda. While not the easiest cheese to shred, it made the fondue so rich and creamy. This is definitely a keeper.
Three Cheese FondueAdapted from AhLimP's submission on allrecipes.com
1 c. white wine
1 Tbsp. butter
1 Tbsp. all purpose flour
1 tsp. minced garlic
7(+/-) oz. Gruyere, shredded
7(+/-) oz. extra sharp white cheddar, shredded
7(+/-) oz. gouda, shredded
(or chopped as gouda is hard to shred)
Melt the butter on low heat in the fondue pot. Stir in the flour to make a roux. Cook 1 minute, give or take, so the flour taste cooks out. Note: my heat was a little too high at first, so I added the wine after about 30 seconds so the roux wouldn't burn. Add the wine and garlic to the mixture and stir well. Add the cheeses, a handful at a time, and continue to stir to melt everything. Once it's all melted and creamy, start dippin'!

Our favorite dippers include soft pretzels, rye bagels (toasted), blanched cauliflower & broccoli, roasted pearl onions, asparagus, potatoes & cremini mushrooms, and steak.
All gone!
I'm linking this post up to this week's Ultimate Recipe Swap over at Life as Mom. Her topic this week is New Year's foods, and while we're having steak this year (a gift from Buppy's dad that we received earlier this week), fondue at home would make a perfect, decadent & delicious meal for New Year's. Something to plan for next year for moi. Enjoy!

Chai Tea Latte Mix

I love chai tea. I love lattes. I can't afford to hit up Starbucks everyday in the winter to keep warm, so I like to whip up a batch of this chai tea latte mix and keep it on hand. I first got the idea when I was living with a roommate in '08 and she said she loved these lattes, too. Instead of a Starbucks gift card, I decided to search the 'net and create the mix for us to keep in our apartment. I placed some in a cute snowman jar I purchased at a department store (the kind with the rubber seal on the lid), tied a bow around it, found a little wooden spoon to go with it and bam! Instant present. And she loved it. Now around Thanksgiving time I like to make a batch since I know it's only going to get colder out. It makes quite a bit but keeps well. Or give some to your friends & family!

Chai Tea Latte Mix
Not sure where I picked this recipe up

¾ c. non-fat dry milk powder
1 ¼ c. powdered non-dairy creamer
1 ½ c. French vanilla flavored powdered non-dairy creamer
2 c. sugar
1 ¼ c. brown sugar
2 c. unsweetened instant tea
2 tsp. ground ginger
2 ½ tsp. ground cinnamon
1 ¼ tsp. cloves
1 ½ tsp. ground cardamom
1 ½ tsp. ground nutmeg
1 tsp. allspice
¼ tsp. finely ground white pepper

Mix all ingredients together. In a blender or food processor, blend 1 c. at a time until mixture is the consistency of fine powder. To serve: stir 2 heaping tablespoons of the mix into a mug of hot water. To make richer & creamier, use 2% milk instead of water.

I made it without the cardamom the first time because I didn't have any on hand and it was ridiculously expensive at the time. I didn't miss it. This time around, I'll be adding it since my sister brought me some. While I'm sure it'll be a great addition, as I said, it wasn't missed when not in the mix. Enjoy!

This post will be linked to Life as Mom's Ultimate Recipe Swap for favorite holiday (Thanksgiving) recipes. Check out her blog for more great ideas!

Thanksgiving Pictures, Images and Photos

Photo courtesy of ugalulu via photobucket.com.

Wednesday, August 25, 2010

Chocolate Brittle Surprise

Since Christmas is just around the corner [hey, it is in my book because I’m that girl who listens to Christmas music in July!], I thought I’d post something that has worked out beautifully as part of gift baskets for friends and coworkers during the holiday season in past years. It’s really easy to make, although be careful not to burn yourself with the hot butter/sugar mixture, ‘cause that hurts in a major way [ah, the voice of experience]! And watch it closely --- it’ll burn before ya can yell “what the . . . ”!

I made a few pans of this last year and the year before, broke ‘em up, slid ‘em into cute little holiday food bags and called it a day. And trust me, it’s not like getting fruitcake. People actually enjoy this “surprise”! No, I have no idea why it’s called "surprise" either. Perhaps because it’s made with soda crackers and that’s somewhat surprising? Hmmmmm, wish I could remember where I found the recipe . . .

Chocolate Brittle Surprise

35 unsalted soda crackers
1 c. butter
1 c. packed brown sugar
2 c. semisweet chocolate chips
1 c. chopped pecans

Preheat oven to 350F. Cover a cookie sheet with foil and spray foil with nonstick spray. Place crackers on foil in 5x7 rows. Microwave butter on high for 2 minutes; add brown sugar, stir and microwave another 2 minutes, stirring every 30 seconds. Pour over crackers and bake 10-15 minutes, checking often starting around the 10-minute mark [to make sure the mixture does not burn]. Remove from the oven and sprinkle chips and nuts over hot crackers; spread after 2 minutes [chips should have melted]. Refrigerate 1 hour; break into pieces. This can be frozen, by the way.

See? Super duper easy! Easy as, well, chocolate brittle surprise! And I bet variations would be just as tasty as the original, like using white or butterscotch chips instead of semisweet. Don't they make peppermint ones around the holidays, too? Now I'm going to have to play around with this --- enjoy!
Update: This will be linked up to Life as Mom’s Ultimate Recipe Swap for today, Thursday, 12/2/10. It's for favorite cookie recipes today, and while I realize this isn't technically a cookie, it wouldn't be the holidays around here without some of this fabulous little dessert. Check out her site for more great holiday cookie ideas!

Thursday, August 19, 2010

Slow Cooked Pork Goodness

Yesterday, I took a risk. Let me tell you how fabulously it paid off!

Awhile back, Buppy and I purchased part of a pig from a coworker of his. Whether we got ¼ or ½ of the pig, I’m not sure. We got bacon, sausage, loin, tenderloin and whole bunch of packages labeled “pork roast”. Hmmmm, how nondescript. While I’m familiar with cooking with different cuts of pork, it gets much more complicated if the package isn’t labeled and you have no idea what cut you’re working with. At least for me.

A month or so ago, I decided I wanted to make a
garlic-oregano pork roast like my mom makes. I pulled out a “pork roast” from the freezer, cooked it like normal, and it was tough. Horribly tough. This particular pork roast is supposed to fall apart, and off the bone if there is one in the roast. It was such a struggle to try and get the meat off the bone, and it had almost no garlic-oregano flavor. Ick. Total let down.

While on vacation, I discussed the issue of my mystery cuts with my parents, and we decided that I should try to cook one in a slow cooker and see what happens. So earlier this week I pulled out another roast, thawed it and plopped it in the slow cooker yesterday morning before work. I added some water to the bottom, sliced up about ½ a large onion and threw that in, then rubbed all sides of the roast with hickory smoked salt. I sprinkled pepper on top, put the lid on, turned that baby on low and left for work.

Buppy didn’t get home much sooner than I did last night, and both of us agreed the house smelled very tasty. The meat was fall-apart tender. The onions were absolutely fabulous. I think I could cook a whole field of onions in that juice and call it a meal. Serious yum-age. While it didn’t have a whole lot of hickory smoked flavor, that was alright because we added some to our sammies. I was careful when I rubbed it on because I once-upon-a-time way over salted some pork chops with it. Good flavor, but it’s important to remember it’s salt and not seasoning.

I shredded the meat and we both had sammies on whole-wheat buns for dinner. Buppy mixed some BBQ sauce into his meat before loading it onto the bun, but I just built the sandwich with the pork, a little more hickory salt, some of the cooked onions and then added some of the juice from the meat. A side of fried potatoes and onions rounded out our meal; corn on the cob was scheduled to make an appearance too, but it had dried out and looked too pathetic to even attempt to cook.

So there you have it. Cook mystery meat in the slow cooker and you shall be rewarded. And don’t forget to add lots & lots of onions! Enjoy!


*Linked to Life as Mom’s Ultimate Recipe Swap today, 3/10/11, for slow cooker recipes.

Thursday, June 17, 2010

Garlic-Oregano Pork Roast [Love you mom & dad!]

I blame my parents for this one; it's good, but not good for me! And I'd like to apologize right now for the lack of pork pictures, but I haven't made this in awhile. Instead, you can see pictures of my mom's wonderful pies, since I'm talking about her cooking anyway!Homemade pecan pie with pecans that grow on my parent's property in Texas. Definitely my favorite pie ever!

My parents are amazing in the kitchen. I know my dad's mom was too, but I'm not sure about my mom's mom. Both my parents cook, although my mom is definitely in the kitchen more than my dad. From my dad's chicken soup to my grandma's chili to my mom's pies, I grew up eating good stuff. I love them for many things, and that's definitely one of them, even if my love for cooking didn't blossom until a few years ago.
Homemade cherry pie my mom made with sour cherries we picked the day before in Door County, Wisconsin.

This is a 'recipe' I got from them, although you can't really call it a recipe. And I can't give you exact measurements because, well, they rarely measure things [except in baking, but we all know that's pretty much mandatory!] I'll do my best to walk you though things though, because in the end, you'll thank me. And kiss my toes!

I can't quite remember what cut of meat I've used for this in the past, but I think a shoulder arm roast or a shoulder blade [Boston] roast would work well. Both are intended for roasting, which is what you want. Do not use any type of loin here. While I love pork loin and tenderloin, they have their own uses in the kitchen, and this ain't one of 'em. The whole point is to have the meat basically fall off the bone because it gets so tender. Loin will never do that for ya, nor should it.
Garlic-Oregano Pork Roast
The recipe came from my parents, blame them for the vagueness!


Pork roast [shoulder arm or shoulder blade, preferably]
Garlic powder
Dried oregano
Salt & pepper, to taste

Preheat oven to 400F. Season roast with garlic powder, oregano, salt and pepper as desired. Place in roasting pan; add enough water to cover the bottom of roasting pan and bake for 15-20 minutes. Turn the oven down to 300F (somewhere between 275F-325F depending on your oven) and continue to cook for another 2+ hours or until roast basically falls apart.

Yup, that's all there is to this bad boy. Super yummy. I always make homemade gravy out of drippings because, well, I'm a gravy junkie. Funny story --- before Buppy met wonderful lil' moi, he'd never made homemade gravy. Always used the jarred stuff. I think he definitely appreciates my abilities in the gravy department nowadays! Thanks to my wonderful mom & papa for this recipe [and for teaching me how to make gravy]!
My parents dropping me off at the airport as my vacay home [to Wisco] ended.

*This post is linked to Life as Mom’s Ultimate Recipe Swap for Favorite Cozy Foods. Stop on over for more great ideas.

Wednesday, June 16, 2010

The Ultimate Indulgence

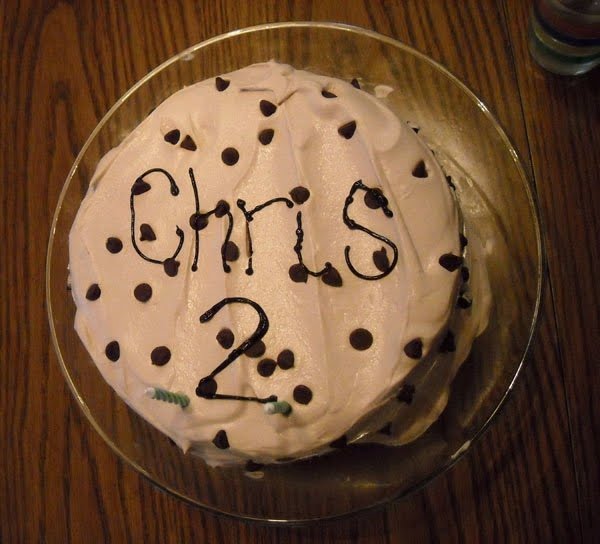
Tomorrow's theme at Life as Mom’s Ultimate Recipe Swap is birthday cakes, so I thought I'd finally post what I made for Tiny Tot #2's birthday in 2009.

The story begins with his favorite food at the time: cookies, chocolate chip specifically. My idea was to make a cake for him that appeared to be a cookie. I thought about a giant decorated cookie, but in the end went with the cake idea. So incredibly happy I did. And so was Buppy's family. I think that cake will live on in all our minds and taste buds until a.) we're old and can't remember anything anymore, or b.) I make another one. 'A' might be the more likely thing to happen, but you never know.The cake wasn't complicated by any means, although we did struggle with the frosting tinting until my sister saved the day. Here we go . . .

I purchased 2 boxes of Ghirardelli brownie mixes and baked according to package directions in round baking pans. Then I basically made a sandwich out of them with
Hoffman’s ice cream, which I've learned is some of the best ice cream I've ever had. Hoffman's is local, so don't get your hopes up, but still, any ice cream you choose to use [think peanut butter to go with the chocolate!] will be spectacular. The party was in late Feb., so I decided to use their peppermint. I kid you not, that stuff is amazing. Wonderful. Yummy. Delish. All their ice creams I've had thus far have been good, but their seasonal peppermint stick just rocks my socks. In a major, major way.Once I've got the sandwich made, I stick it back into the freezer to firm up. Hmmmm, now how to make it look like a chocolate chip cookie? I'd decided I wanted to use whipped topping as frosting, but how to tint it brown? I tried food coloring with very unsuccessful result. Buppy and I thought and thought and thought. And then we thought some more. Then I called my sister, who is an artist, among other things, and therefore much more creative than I am. Her response when I told her my conundrum? "Uh, so you don't want to use cocoa powder?" Sheer genius my girl! I knew I called her for a reason! Apparently she told the story to my dad, and even before she told him what her suggestion was, dad made the same comment: why don't they want to use cocoa powder? Because neither Buppy nor myself thought of it! How we didn't, I'll never know, but I'm happy someone could point me in the right direction. I did as suggested and used cocoa powder to tint the whipped topping a light brownish color, then sprinkled chocolate chips all over it.

This was honestly love at first bite. John's nieces asked me to make their next birthday cake. Everyone present loved this. The simplicity of it still baffles me, but I'll go with it. Brownies, local peppermint stick ice cream, whipped topping and chocolate chips. Sometimes I amaze myself. Please-please-please try this out if you haven't before. You won't regret it, promise! And if you'd like to see more birthday cake ideas, head on over to Life as Mom’s blog. Enjoy!

Oh yeah, and once upon a time, I made a train cake for Tiny Tot #1's 4th birthday. I was pretty proud of this one since it was my first-ever attempt at making a birthday cake!

Monday, June 14, 2010

A Twist on the Reuben

I'm a corned beef lover. There, I said it. Don't be jealous Buppy! To be honest, I'm a total carnivore and love most meats, but corned beef holds a special place in my itty-bitty heart. The seasoning, the tenderness . . . oh how love it all! Corned beef & cabbage? Yes please! Reubens? You betcha! A big hunk o' corned beef on my plate with nothing else? Sure!

My big hang up at restaurants though is Thousand Island dressing on reubens. Ick. Blecky. That stuff is almost always down-right horrible. Ruins my sammy in my humble opinion. And the worst part? Every now and then I forget to ask them to 86 it. And then I'm stuck with it. In all it's gross glory. Usually I cope and chalk it up to my own forgetfulness [no one else to blame, damn] and it's still a decent sandwich. The exception to this that really sticks out in my mind happened in the Inner Harbor in Bmore at the M&S Grill. Beautiful little restaurant, outside seating next to the water, plenty of people watching to be done . . . and the worst Thousand Island dressing ever. Even Buppy agreed, and he likes the stuff! We actually switched meals and he choked down my sandwich [I don't even remember what he ordered and I ended up eating, but it sure was better than that nastiness!]

I don't generally like Kraft salad dressings either; not that they're bad, I just have other brands I prefer. Except for Kraft's Thousand Island with bacon. I wouldn't eat the stuff on a salad, but it actually adds some nice pizazz to reubens. Good job Kraft, well done!

So where is all this talk of corned beef and reubens going? To reuben pizza, of course! I saw a recipe card once upon a time in a Taste of Home magazine and always thought, "Man, I wish I could make that, but what would I use for sauce because Thousand Island dressing is baaaaaaaaaad stuff?" But now that I've found I like Kraft's, I did it. I made the pizza. And it was everything I dreamed it would be. Can I get a woo-hoo?
There's no real recipe. We used an $.88 dry packet of pizza dough that you just add water to and let sit for 5 minutes. Note: Buppy has the hardest time spreading the dough out in the pan, so he is no longer allowed to attempt this step. Trust me, it wasn't pretty. The dough was spread out onto a rectangular baking sheet until it was as thin as I wanted. I'm a thin crust kinda gal, but not cracker thin. We then spread some Kraft thousand island dressing onto the crust; enough to where it doesn't look like the pizza will be dry in the end. I didn't use as much as I'd have used were it a normal pizza with red sauce, if that helps any. We toss on some well-drained sauerkraut; important to drain well so the pizza doesn't get soggy. Trust me, I once made a Hawaiian pizza with crushed pineapple --- you can imagine how that turned out. Won't do that again!Back to the reuben pizza: we topped the sauerkraut with chopped leftover corned beef from the night before. On top of that? Oh yeah, shredded Swiss cheese. We baked it per our pizza dough package instructions, and about 10 minutes later had a thing of beauty sitting before us. That pizza was good. Like real good. Like hide-the-leftovers-for-yourself good. Try it; you can thank me later. Enjoy!


*This is linked to Life as Mom’s Ultimate Recipe Swap for 3/17/11 for St. Patrick's Day recipes. Love it!

Tuesday, April 27, 2010

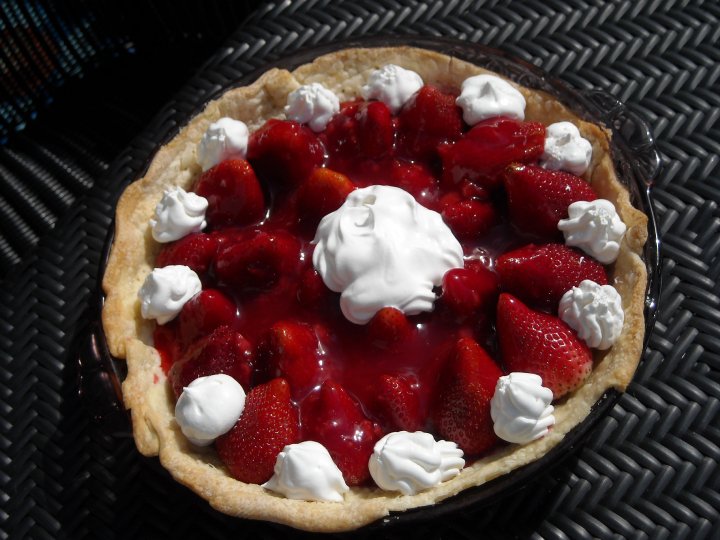
Fresh Strawberry Pie

This is good. Like, real good. Messy, I'll admit, but worth it. Simple, too. Oh, and it's pretty!

Fresh Strawberry Pie
Adapted from Taste of Home's Light & Tasty Annual Recipes 2005
Judy Watson, Newmarket, Ontario

2 pints fresh strawberries
1 pastry shell [9 in.], baked
2/3 c. sugar
1/2 c. water
2 Tbsp. cornstarch
2 Tbsp. cold water
5-6 drops red food coloring, optional
Reduced-fat whipped topping

Set aside approximately 1 c. strawberries. Arrange remaining berries in pie shell. With a fork, mash reserved 1 c. strawberries; set aside.
In a saucepan, combine sugar and water; cook and stir until sugar is dissolved. Add mashed strawberries and bring to a boil. Combine cornstarch and cold water until smooth. Gradually stir into strawberry mixture. Bring to a boil; cook and stir for up to 2 minutes until thickened [mine thickened almost immediately, just FYI.] Stir in food coloring if desired. Cool for 15-20 minutes, stirring occasionally. Spoon over strawberries in crust. Refrigerate for at least 2 hours. Garnish with whipped topping. Yield: 8 servings.
The original recipe calls for 3 pints plus 1 c. of strawberries, but to be honest, I'm not sure what'd I'd have done with all the extra berries. I used the 2 pints I had on hand and that seemed like the perfect amount. I suppose I could have mashed up a few more for the cooked mixture, but I don't feel like I shorted myself at all using only 2 pints.

This pie definitely didn't hold it's shape when it was taken out of the pie plate, but that's not a huge thing for me. As long as it tastes good --- that's more what I'm all about. I'm sure I'll make this again during the summer months. Enjoy!

P.S. Today I discovered that Life as Mom's Ultimate Recipe Swap topic is summer recipes. This is really the epitome of summer for me as I used to picked fresh strawberries every year with my grandparents when I was young. That's how you knew summer was really here. For more great summer recipes, check out her site!

Easy Waldorf & Raisin Salad

I grew up eating and loving my mom's Waldorf salad. I know now, as an adult, that it's not exactly something I could consider healthy. Yes mom, the apples, raisins and nuts are all good for me, but the marshmallows and mayonnaise aren't.

When I saw this recipe in my cookbook, I knew I had to try to make it so I could be healthier but still indulge in a salad that I've loved since childhood. While not exactly like my mom makes, it was really good. I took this, along with a fresh strawberry pie [to be blogged about soon] up to Gettysburg when we were up visiting Buppy's parents this weekend. They both liked it, too. I can tell you that Tiny Tot #1 did not like the raisins, which is odd because he eats them for lunch whenever we send them in with him. Tiny Tot #2 loved the raisins and didn't really want to eat anything else in the salad. I think that was partly my fault --- I was in a hurry to make this and cut the apples a little large for his mouth.

Easy Waldorf and Raisin Salad
Adapted from Taste of Home's Light & Tasty Annual Recipes 2005
Janice Smith, Cynthiana, KY

4 c. cubed apples
1 c. unsweetened pineapple chunks, drained & chopped
2 Tbsp. chopped celery
2 Tbsp. chopped pecans
2 Tbsp. raisins
1 c. [8 oz.] reduced-fat sour cream
1 Tbsp. reduced fat mayonnaise
1 1/2 tsp. sugar
1 1/2 tsp. orange juice

In a large bowl, combine the first 5 ingredients. In a small bowl, combine the sour cream, mayonnaise, sugar and orange juice. Pour over the apple mixture; toss to coat. Cover and refrigerate for 2 hours or until chilled. Toss just before serving. Yield: 6 servings.

I can't post the nutritional info for this one as listed in the book as I changed the recipe slightly. Oh well, overall it's still light & tasty, and that's what matters to me. The orange juice not only helps keep the apples from turning brown, it added a really nice hint of citrus to the salad as well. I'll definitely make this again, especially now that it's Spring and fruit salads are all the rage [in my book anyway]! Enjoy!
*Sorry, really bad lighting for the pic!

Linked to Life as Mom’s Ultimate Recipe Swap for 3/24/11 - Spring Recipes.

Tuesday, April 6, 2010

Welsh - A - What?

For a long, long time, I've wanted to try Welsh rabbit. I've only had rabbit once or twice when I was young, and to be honest, it tasted like chicken. Chicken in a lot of butter. So it really tasted like butter. But I figured that if common ol' hippity-hoppin' bunnies are good pan-fried in some tasty hot butter, Welsh rabbit must be better. And I was right!

Welsh rabbit is warm and smooth and creamy and . . . . wait, what? You mean it's not "rabbit"? For real?? Oh.........it's rarebit. That makes so much more sense now. Whew.

So lets do a quick run through of what Welsh rarebit is and what it isn't. Sometimes yes, it's called Welsh rabbit [and that's ok!], but it has nothing to do with rabbits [or meat of any kind for that matter], so I'm going to stick with rarebit. It's basically a localized variation of fondue, with the main difference being that classic fondue generally depends on Swiss cheese as it's base and Welsh rarebit focuses on cheddar. Cheddar cheese sauce served over toast or crackers = Welsh rarebit. You can go to
Wikipedia to check out what they have to say about the matter. Anyway, guess what? I don't wanna play in their sandbox. I wanna play in my own.

My sandbox consisted of taking a standard Welsh rarebit recipe and tweaking it. I didn't use a double boiler to prepare mine since I didn't have one, and instead I used my almost-brand-new electric fondue pot on warm. I also halved the recipe, which was almost a total success. Execpt that I accidentally added the full amount of salt. And a whole egg, because really, who can halve a whole egg once beaten? Yeah, I thought so.
I also used a mixture of double cheddar cheeses and an Italian mixture, because that's what I happened to have on hand. And while my original intention was to serve it over toast topped with asparagus [my grandmother made something similar a lot when I was a child and it was divine!], I ended up omitting the toast [change of meal plan] and simply served it as a cheese sauce over the asparagus. Guess what? Even with all my changes, it was still good! A little salty, but hey.

The recipe listed below is how it appears in my The Joy of Cooking tear-off calendar, not with my changes because I'm not sure who'll want to halve the recipe and who'll have an electric fondue pot vs. a double boiler. Just know that it's flexible, so play around with it until it suites your needs. While I'm sure this would be great on toast or crackers, I'm sure it'd be good on most veggies [think broccoli, cauliflower, etc.] as well as steak oscar. Mmmmmm, steak oscar. That's a whole 'nother post right there folks. But --- back to the recipe:


Welsh Rarebit
The Joy of Cooking Tear-Off Calendar 2010

1 Tbsp. butter
1 c. beer, ale, milk or cream
4 c. shredded sharp cheddar or Colby cheese [1 lb.]
1 egg, well beaten
1 tsp. Worcestershire sauce
1 tsp. salt
½ tsp. sweet paprika
¼ tsp. dry mustard
Pinch of ground red pepper
12 slices white, rye or other bread of choice, toasted, or 18 crackers


Melt the butter in a double boiler over simmering water. Once melted, stir in whatever liquid you choose to use [beer, ale, milk or cream] until warm. Gradually stir in the cheese. Cook, stirring constantly with a fork, until the cheese is melted. Stir in the remaining ingredients [except bread/crackers] and cook, stirring, until slightly thickened, about 1 minute. Serve at once on top of bread or crackers. Yield: 6 servings.

This was good. I'll be making this again, for sure, to top veggies and whatever else comes to mind. Enjoy!

Note: I'm linking this up to Life as Mom’s Ultimate Recipe Swap for today, 1/20/11, which is all about meatless meals. For more ideas, feel free to pop on over to her site.

Tuesday, February 9, 2010

Easy-Peasy Baked Chicken & Cheesy

I admit it, most of my recipe that I picked up while in college are things I've never actually made until now. And I feel really bad, because at that point in my life, I didn't really care where I got the recipe. I just copied it onto the computer and saved it to try at some future date. I have no idea where most of them came from, but now that's neither here nor there. I have yummy recipes and you can, too. Because nice girls share.

This is a recipe I actually have made once or twice, and I know for a fact that Buppy has made it for himself and the kids once (before we were cohabiting). I think they liked it; I know he did, but I'm not 100% sure about the kiddos. Who cares though, since their tastes change quicker than my undies. Is that sharing too much? Probably. Back to my point --- this recipe uses pantry ingredients, is quick to throw together, and you can pretty much forget it once you stick it in the oven. Unless you're like me and have an oven that bakes unevenly. Then you have to think about it again halfway through the baking process so one side doesn't over bake while the other doesn't fully bake. Take my advice and set a timer! What a pain. Ah, story of my life: the uneven-baking oven. Seriously.

Baked Chicken & Cheese
I got nothin'.

4 boneless, skinless chicken breasts (Mine generally run rather large, so I cut them in half and then they're the size of normal chicken breasts; if yours are small, use more.)
8 slices Swiss cheese
1 can cream of chicken soup
½ c. skim milk
¼ c. reduced-fat sour cream
1 ½ c. herb stuffing mix
¼ c. melted butter
Mushrooms (optional, but I really love mushrooms!)


Place chicken in buttered 9"x13" baking dish; top with slices of cheese. Mix soup, milk and sour cream (and mushrooms, if using) together and pour over chicken/cheese. Top with stuffing and pour melted butter on top. Cover with foil and bake at 350F for 30 minutes; uncover and bake 30-40 minutes more.Buppy's problem was that he thought this was a faster recipe than it is because he neglected to read the part about "bake 30-40 min. more after uncovering." I think he got mad at me. Not my fault Mr. I-didn't-read-the-recipe-through-before-beginning-dinner! If you've got the time, give it a try. I promise you won't be disappointed! Enjoy!

*Linking this bad boy up to Life as Mom’s Ultimate Recipe Swap for Favorite Recipes today, 2/17/11.

Sunday, January 31, 2010

Buffalo Chicken Dip

Have you ever had buffalo chicken dip? I hadn't until I met Buppy. It's one of the yummy foods he's introduced me to, and I really appreciate that. It's not a complicated dip by any means and is pretty quick to come together. This would be an awesome addition to any Superbowl spread, trust me. If you like chicken wings, you're gonna love this dip. Buppy often eats it with flat bread, but I also discovered that it's crazy-tasty with celery sticks. Makes sense, right? You usually get celery sticks when you order buffalo chicken wings at restaurants, so it just seemed like the right thing to do. Besides, this helps me feel just a scoach more healthy. Yeah right.

Since I just recently blogged about how I'm trying to cook bone-in chicken in the crockpot to shred for use at a later time, this would be the type of recipe where I'd use the chicken. Because seriously, canned chicken just isn't quite right.

Buffalo Chicken Dip
No idea where Buppy picked up this recipe, but I'm sure there are a zillion different places it can be found.

8 oz. 1/3 less fat cream cheese, softened
1 1/2 lbs. of chopped or shredded chicken
3/4 c. Frank's Red Hot Original Hot Sauce
1 c. light/reduced fat ranch or Bleu cheese dressing

Heat cream cheese, hot sauce and dressing in a saucepan over medium-low heat until smooth, creamy and a somewhat orange-y color (doesn't that just sound healthy --- "an orange-y color"?) Add chicken and continue to heat until heated through. I added chopped pickles on top as garnish and to add a little bit of crunch; I must say they were a nice addition. Serve with Tostitos, flat bread, veggies, crackers or whatever else you can think of to dip.

I'm really surprised by some of the things Buppy has introduced me to that I'd never heard of/tasted previously. Was I living under a rock? Whatever the case, my recipe repertoire just keeps on growin'! Enjoy!
This is being linked up to this week's Ultimate Recipe Swap for favorite holiday foods. Buppy & I are excited to introduce this to the rest of my family next week when we head to Wisconsin for Christmas. My brother is pretty psyched for this, and Buppy's excited to be able to devour more of it, too! Check out Life as Mom’s blog for more great holiday dish ideas!

Wednesday, January 20, 2010

Don't be a raspberry hater!

This used to be what I'd call my go-to dessert for date night, which I'd use when trying to woo whoever was making my skirt flutter at that particular moment. I'm pretty sure (although not positive) it came from Keebler in some newpaper or coupon insert I happened upon one day when I was 18 or 19. It looked good, I love raspberries, end of discussion.

I haven't made it for a few years now, but decided to give it a try again this past weekend when we had friends over for dinner. Even though I was late leaving work on Thursday night and still had to stop at the grocery store for a few last-minute items, I still made this in relatively little time and with minimal effort. Don'tcha love desserts like that?

This past weekend was the first time Buppy tried this, and come to find out, he doesn't think he likes frozen raspberries.

Well I don't think we can be friends then anymore Mr. Raspberry-Hatey-McHaterson.

They're my favorite berry, hands down. He said he likes fresh but that frozen are too tart for him, like cranberrys (which I like, too). Hmmmmm. He thinks I should make it again with strawberries and my mom, after I told her about the recipe, thought it'd be great with blueberries. I'm sure it would be, so change up the berries to your heart's content! Hell, spread some peanut butter in there instead and I'm sure that would rock, too. But seriously, how can you not love these beauties??

Chocolate Raspberry Cheesecake

1 Ready Crust (6 oz.) (Original recipe calls for a chocolate crust, but I like it better with a regular one)
6 oz. cream cheese, softened
1 can (14 oz.) sweetened condensed milk
1 egg
3 Tbsp. lemon juice
1 tsp. vanilla extract
1 c. fresh or frozen raspberries
*Chocolate Glaze

Preheat oven to 350F. Beat cream cheese with mixer until fluffy. Gradually beat in sweetened condensed milk until smooth. Add egg, lemon juice and vanilla; mix well. Arrange raspberries on bottom of crust. Slowly pour cheese mixture over fruit. Bake 30-35 minutes or until center is almost set. Cool. Top cheesecake with chocolate glaze; chill. Garnish as desired. Refrigerate leftovers.

*Chocolate Glaze: In small saucepan over low heat, melt 2 (1 oz. each) squares semi-sweet baking chocolate with ¼ c. whipping cream. Cook and stir until thickened and smooth. Remove from heat. (I used semi-sweet chocolate chips this time around and just measured out 2 oz. on my kitchen scale. Still worked great!)


Enjoy!

Update: I'm linking this recipe up to lifeasmom.com this week for her "be cool" ultimate recipe swap. Check her blog for more great recipes!

Tuesday, January 19, 2010

Superbowl Party-Perfect Dip

It always amazes me when I come across a recipe that's simple, easy and so yummy, that I've made several times in the past, but have yet to blog about. Ah, so is the life of the girl who loves to cook and eat! I guess I just can't keep track sometimes.

I checked in at
Life as Mom’s blog today to see what upcoming URS (ultimate recipe swap) topic is scheduled for this Thursday. It happens to be pantry inspiration. I happen to have a recipe for a cold spinach dip that just happens to fit that title. It was meant to be. Be warned, fellow dip lovers, this stuff is addicting. Seriously. Even for people like Buppy, who whine about spinach in every other recipe; he still devours this stuff. There's no going back after you've sampled this stuff. This is definitely made with items I keep on hand in the pantry/fridge/freezer. And guess what? This would be perfect to serve at a Superbowl par-tay!

Cold Spinach Dip
Sorry, no idea where I picked this one up!

1 c. reduced fat or fat free mayo
1 (16 oz.) container reduced fat or fat free sour cream
1 (1.8 oz.) pkg. dry veggie soup mix (I use Knorr brand)
1 (4 oz.) can water chestnuts, drained and chopped
1 (10 oz.) pkg. frozen chopped spinach, thawed and drained

This is just me being anal, but I always chop the spinach before mixing it with other ingredients, even if the package already says 'chopped'. It's better to have bite-sized spinach than to have it hanging off every dipper your working with here. Anyway, in a medium bowl, mix together all ingredients. Chill for 6 hours or overnight. Serve with veggies, crackers or bread dippers. 24 servings.

I know it's not the healthiest of all things to eat, but that's ok. I'm thinking that, especially since I just picked up some Chobani plain Greek yogurt for free with coupon at Giant, I'll use it next time to replace the sour cream. As for the mayo? Hmmmm. I could probably decrease that to 1/2 c. and add more of the Greek yogurt if I wanted to be all healthified. Since that might help me squeak in another year of life, I just might give it a shot. Yes, decreasing the mayo by 1/2 c. will grant me an additional year of life. You heard it here first folks.

Buppy and I really like this with roasted garlic Triscut crackers, even though overall I'm usually not a big Triscut fan. It's really good with celery and carrots as well, and when we had Buppy's family in for Thanksgiving, we found out (by his dad just deciding to try it) that it makes an exceptional sandwich spread. Next thing ya know we'll be toppin' ice cream with this stuff!

Enjoy!

Check out Life as Mom's
Ultimate Recipe Swap for more great 'pantry inspiration' meals!

Thursday, October 8, 2009

But I don't even like meatloaf.....

Yes folks, I admit it. I'm that person who says I don't like meatloaf. The person who would never, ever order it in a restaurant. Never eat it on a buffet. Generally I wouldn't eat it at another person's house either. I don't want taco meatloaf or Reuben meatloaf or BBQ meatloaf. I'm just not into meatloaf. Except my mom's.

I'm not sure what it is about her meatloaf that I love so dearly. I made it myself for the first time sometime this past Spring when Buppy said he wanted a "classic" meatloaf. No fuss, no frills, no bells, no whistles. Just classic, traditional meatloaf. I thought of my mom's recipe immediately since that's really the only meatloaf I'd ever put in my mouth. I'm not saying that everyone out there makes terrible meatloaf, please don't misunderstand me! I just think it has something to do with the meat . . . being in a loaf. It sounds so unappetizing to me. Anyway, maybe it's that the grew up on my mom's and therefore that's all I trust. I don't know; I like to think of myself as a pretty experimental cook who makes lots of different dishes with different flavors and inspirations.

Well, whatever the case, my mom's recipe is the bestest of the best for a classic. It's pretty gosh darn simple (which surprised me, kind of, when she told me over the phone what went in it.) But I gave it a go and it was all Buppy and I'd hoped it would be. Yum!

Please keep in mind that, as with most of my recipes, measurements are approximate and half the time don't actually get measured out in my kitchen. Dump, sprinkle, shake---whatever. I realize that amount of ground beef in the recipe is a bit odd, but that's because it was the size of the package I happened to have on hand and therefore I approximated everything else around that particular size.


Mom’s Meatloaf

1.35 lbs. ground beef
2 slices bread, cut into small cubes
1 Tbsp. milk
2 ½ Tbsp. ketchup, plus some for the top
½ of a (medium) raw onion, finely chopped
Salt & pepper, to taste

Combine all ingredients in a large bowl and mix together with hands until well blended.
Form into a loaf and place in loaf pan or roaster. Spread ketchup (as much as you wish) on top. Bake at 350F for approximately 50 minutes or until meat thermometer reads done. Yield: 3 servings. Does it get any simpler people? No. Any better tasting? Nuh-uh.


This recipe will be linked up to the URS (Ultimate Recipe Swap) on Life as Mom where beef is the menu item this week. I love her URSs!

Thursday, August 27, 2009

Sneaky Zucchini

Buppy has been pressuring me to post this recipe since he first tasted it. I told him I wanted to wait until I had uploaded the photos of it, and now that I've accomplished this, I can post --- yay!

I found this recipe on the Taste of Home website and decided it looked like something that might be good to make for Buppy and the kids to eat while I'd be on vacation. You know how lasagna is good leftover, right? Well I decided to make this on the Tues. night (while home alone) before leaving for Wisconsin so they could have it as a meal on Wed. or Thurs. night. While not a major hit with the kids (well, the youngest started to eat it up but stopped when his older brother decided he didn't like it), Buppy thought it was fantastic. He's asked me to make it several times since then, which I haven't (sorry babe!) It's been hot outside lately, crazy hot, so maybe once it cools off a little I'll throw another batch in the oven.

I changed the recipe slightly based on what we like. The recipe called for ground beef, but since we like Italian sausage better, I subbed the sausage for the beef. I'm pretty sure I used more than half of an onion, but I'm kind of an onion freak. The recipe called for a can of 'Italian tomato sauce', but I used jarred spaghetti sauce (I keep meaning to make my own but this was quicker that night!) I also jazzed that up with some Italian seasoning and garlic, if I'm not mistaken. After all, the recipe didn't call for any garlic! How could this be? Eh, I fixed that, no worries. Lastly, it called for chopped green pepper. Neither Buppy nor I care for peppers of any color, but since we love mushrooms, why not throw some in there instead, right? And that's what I did.

I'll admit I forgot to drain the meat before adding the sauce, so mine was a little more watery than I'd hoped. It still tasted good, it just didn't hold together quite like I thought it would (my fault). To see the orginal recipe, click on the link below. The actual recipe written below is with my adaptations.

Zucchini Pizza Casserole
Recipe adapted from Taste of Home

4 c. shredded, unpeeled zucchini
1/2 tsp. salt
2 eggs
1/2 c. grated Parmesan cheese
2 c. (8 ounces) shredded part-skim mozzarella cheese, divided
1 c. (4 ounces) shredded cheddar cheese, divided
1 lb. Italian sausage (I used hot)
1 medium-sized onion, chopped
1 jar (15 oz.-ish) spaghetti (or homemade) sauce
1 c. sliced fresh mushroom

Place zucchini in strainer and sprinkle with salt. Let stand for 10 minutes, then squeeze out moisture. Combine zucchini with eggs, Parmesan and half of the mozzarella and cheddar cheeses. Press into greased 13x9 baking dish and bake, uncovered, at 400F for 20 minutes. Meanwhile, cook Italian sausage, onion and mushrooms over medium heat until meat is no longer pink; drain. Add spaghetti sauce to meat mixture and spoon over zucchini mixture. Sprinkle with remaining cheeses. Bake 20 minutes longer or until heated through. Yield: 6-8 servings.

This is a really great way to get some veggies into your diet, and I think most people will enjoy this(you can't taste the zucchini). The meat could easily be dropped from this too if you've got some vegetarians you're feeding. Play with it and change ingredients to suit your family's tastes; you won't be disappointed (just ask Buppy!)

Since Buppy never even tried this the night I made it, I'm confident I can link this to Life as Mom’s URS as a 'make ahead meal.' Like I said, I think it's kind of like lasagna because it's better the second day, after all the flavors have had time to mix and mingle. Make it at the beginning of the week and enjoy a day or two later!

Monday, August 17, 2009

A Childhood Memory: Clam Dip

When I was young, my mom used to make clam dip to eat with veggies, crackers and/or potato chips. I look back now and think I must have been an adventurous eater to have even tried such a thing. Even if Buppy's 2 kids tried it now, I suspect they wouldn't like it. Not that I wouldn't let them try it, I just have doubts that they'd actually want to eat it. They tend to shy away from foods they don't know and often pretend not to like things we've seen them eat just recently and enjoy. But that's fine, because that means more clam dip for Buppy and I!

As easy and tasty as this recipe is, I find it baffling that I've never seen it on any restaurant menu or had it at any party/gathering. I've never had it anywhere but in my momma's kitchen. That is, until I busted out and made it myself. It's just as good, if not better, than I remembered! It's great with carrots, celery, broccoli, cauliflower, crackers or potato chips. It's pretty much good with anything (in my humble opinion!) This is a cold clam dip, just to let everyone know, and is super easy to throw together.

Clam Dip

2 (6 oz.) cans minced clams
1 (8 oz.) pkg. cream cheese, cubed
2 Tbsp. chopped instant onion (sometimes I finely chop real onion in place of the instant)
1 tsp. celery salt
1 tsp. Worcestershire sauce

Drain clams, reserving liquid. Beat all ingredients except clams with a handheld mixer (or in a blender or food processor). Make sure to use the reserved clam juice to make the dip whatever consistency you'd like it (some like it thicker, some thinner, so use the clam juice to get it how you want it.) Once everything is mixed well, stir in the clams; chill. Some might want the clams put into the blender/food processor/blended with the handheld mixer if actual chunks of clams are undesirable. To me, they're little chunks of goodness spread throughout this tasty dip. It's up to you though, so experiment and see what tickles your fancy. Also, this is really great with the addition of a little hot sauce or cayenne pepper for kick!

Update: I'm linking up to Life as Mom’s ultimate recipe swap for today (12/31/09) which is New Year's Meals & Munchies. I'm excited to see what recipes I find from the other contributors!

Thursday, August 13, 2009

Slow Cooker Italian Beef

I first tried this recipe for Italian Beef when planning Tiny Tot #2's birthday party for incoming family. Our plan was to do a sandwich extravaganza with cold cuts, different spreads, cheeses, veggies, breads --- we wanted everyone to build their ideal sandwich. There is a restaurant in Stevens Point, WI (where I went to school) called Bill's Pizza; they have the most amazing Italian Beef sandwich ever. I miss it a lot and haven't eaten there in a few years now (I moved away from Point in 2006). I was, however, determined to recreate their masterpiece so I could have a little piece of Wisco here in my new home in MD. This recipe didn't disappoint; I didn't think it would though as it has over 700 reviews and 4.5 stars on allrecipes.com! I only made one change to it as it appeared originally, and that was to add 2 packets of Italian dressing seasoning instead of just 1. Well, that and my roast was slightly smaller than 5 lbs.

Slow Cooker Italian Beef
From allrecipes.com

3 c. water
1 tsp. of each of the following: salt, ground black pepper, dried oregano, dried basil, onion salt, dried parsley and garlic powder
1 bay leaf
2 packets dry Italian salad dressing mix
1 (5 lb.) rump roast

Combine water with everything but the meat in a saucepan. Stir well and bring to a boil. Place roast in slow cooker and pour spice mixture over the meat. Cook on low for 10-12 hours or high for 4-5 (mine actually took a little longer on high than this but eventually did get super tender and fork-shredable). Remove bay leaf and shred meat with forks. Place meat back into slow cooker and let it cook for another hour (or more) on low setting to allow meat to absorb flavors. Great served the next day also. I've found that I like this best on crusty bread, and if you top it with crinkle-cut dill pickles, it's just like Bill's! Enjoy!

The spread for the party --- see the slow cooker waaaay at the end? That's the beef!
*I'm sharing this on Life as Mom’s URS (Ultimate Recipe Swap). I'm late, as slow cooking was the theme last week but hey, this recipe is still worth the mention! Her URS's are awesome for great new ideas to try in the kitchen, so stop over and check 'em out if you've got some time.
Here's a quick pic of Buppy with the 2 kiddos getting ready to blow out the candles. I'll have to blog at a later date about that fabulous cake I created....
Here's a picture using the same recipes on a pork roast instead. While it doesn't absorb quite as much flavor as the beef, it's still really, really tasty.

Friday, July 31, 2009

Bisque, the Zucchini Way

*Update: This week's URS (Ultimate Recipe Swap) by Life as Mom is for quick meals, so I'm adding this to her collection. I'm quickly becoming rather fond of her Thursday URS's and if you'd like to read more about them, stop by here.

Since we've already established that I love soup, this recipe should come as no surprise to anyone. Buppy and I had some leftover zucchini from our summer party, and since I had nothing better to do with it, it was made into a bisque. It didn't take me too long to find a simple recipe on allrecipes.com (I use this site a lot) and to say the very least, it turned out delish!

Zucchini Bisque
Recipe from allrecipes.com

1 medium onion, diced
2 Tbsp. butter or margarine
2 ½ c. shredded zucchini
2 ½ c. low sodium chicken broth
½ tsp. dried basil
½ tsp. salt
½ tsp. pepper
¼ tsp. ground nutmeg
1 c. fat free half-and-half

In a large pot, sauté onion in butter until slightly tender. Add zucchini and chicken broth. Simmer, covered, for about 15 minutes; add seasonings. Puree on low in a blender (I had to do this in several batches). Return to pan; stir in cream and heat through.


This has got to be one of the simplest and most fantastic soup recipes I've ever tried. Buppy loved it too and insists that I make this often. What a great way to use up zucchini if your garden produces bunches of it! (I'm still lacking in the garden department for now. Poo.) This bisque, served with some crusty bread, would make a quick, easy and scrumptious lunch or dinner. We're thinking about adding crab meat (we're in Maryland, we add it to everything!) next time. I'll let you know when that happens. Enjoy!

P.S. Sorry for the lack of pictures. It was a beautiful green color but was eaten too quickly for me to snap a few shots!

Thursday, July 30, 2009

Norwegian Cookies (I *Heart* Christmas!)

Christmas BG! Pictures, Images and Photos
So why not celebrate by participating in
Life as Mom's Ultimate Recipe Swap: Christmas Must-Haves? It's Christmas in July people, and it looks like she's getting a great group of recipes together; I'm really looking forward to exploring other reader's must-haves. I really love the whole holiday season and this seems like a wonderful idea for a recipe swap! My contribution: Norwegian Cookies. Lip-smackin' good!

These cookies turn out crispy, and although I'm not a huge fan of crispy cookies in general, these are definitely the exception. I made them for the first time about 3 yrs. ago for Christmas after randomly choosing the recipe from a Taste of Home magazine, and I'm now expected to make at least 2 batches of these during the holidays. Luckily I don't mind since they're so easy! My only substitution is that I use pecans instead of walnuts simply because my parents live on a pecan grove and I get as many as I want for free!

Norwegian Cookies
Recipe from Taste of Home website

1 c. butter, softened
1 c. sugar
1 egg
1/2 tsp. vanilla extract
1/2 tsp. almond extract
2 c. all-purpose flour
1/2 c. finely chopped walnuts
Red and/or green colored sugar

In a bowl, cream butter and sugar. Add egg and extracts; beat until light and fluffy. Add flour and nuts; beat just until moistened. Cover and chill 1 hour or until firm enough to handle. Shape into 1-in. balls; place 2 in. apart on greased baking sheets. Flatten to 1/4-in. thickness with a glass dipped in colored sugar. Sprinkle with additional sugar if desired. Bake at 350° for 10-12 minutes or until cookies are set. Yield: 3 dozen.

*Tip: I found that the easiest way to get the sugar to stick to the bottom of the glass to press down the cookies is to first rub it on a damp paper towel, then to dip it into the sugar.